First, go into the Users tab and click on the user to configure the phone’s button builder.

Click the ‘Phones’ tab of that user which will show the list of their devices like the image below.
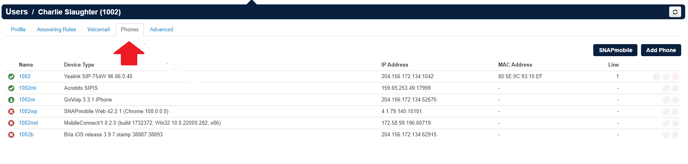
Move the mouse cursor over on the same row of the device you want to configure the button builder for. Then a gear icon should highlight as well as pencil and a red X.
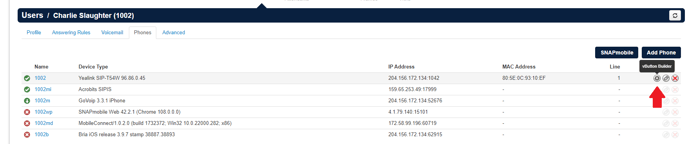

Click on the gear icon of the device to configure. Hit ‘Yes’ in a red button when it asks for editing button configuration.
Then it should open a page that has a button configuration matching the model of that phone like image below.
Numbers in blue indicate the button’s orders. Click on ones you would want to edit and click on ‘Select a Feature’
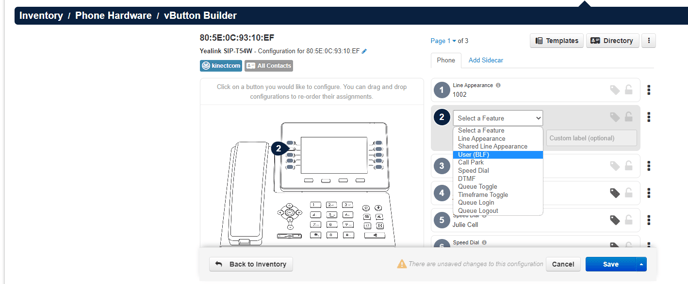
List of available features are:
- Line Appearance: Assigns a user to the line. Mainly, we have two to make it capable of taking multiple calls at once. This means that another call can be answered while on the phone.
- Shared Line Appearance: Shares a line appearance with another phone. Calls to the shared line user can be picked up and held from any phone that has the shared line.
- User (BLF): Shows a user with status (BLF). Calls the user when pressed. Use this if you want to add an EMPLOYEE.
- **Call Park: Parks a call to the entered Call Park. Pressing again will retrieve the call from the Call Park.
- Speed Dial: Calls the entered phone number. Use this if you want to add an external number. Use 10-digit format and add the users name in the "Custom Label" section.
- DTMF: Sends DTMF tones. These can be interpreted to run an application. Compatible string characters include numbers, * (star) and # (hash)
- Queue Toggle: Toggles the active queue status for the user. All queues will be toggled.
- Timeframe Toggle: Toggles the active status of the selected timeframe.
- Queue Login: Logs the user into all Call Queues to which they belong.
- Queue Logout: Logs the user out of all Call Queues to which they belong.
- Move My Call: Switches the user's active call to this phone from another phone.
After choosing a feature, you may have an option to add more buttons/pages depending on the phone’s model. If you do, it will have an option for the ‘next page’ in blue at bottom right corner like the image above.
Once finished, click on the little triangle next to the ‘Save’ button in blue. It will open up an option to either save as a new template or save and resync.

Once ‘Save and resync’ is clicked, the phone will reboot. When the phone reboots, the changes will appear on the phone.
Please keep in mind that it will have a couple of minutes of downtime for the phone to reboot.
Download the PDF