A FaxBridge is used to sync your fax machines with your Kinect2Fax service, eliminating the need for POTS (analog) lines. Setup is quick and easy.
Front and rear view of FaxBridge pictured below:
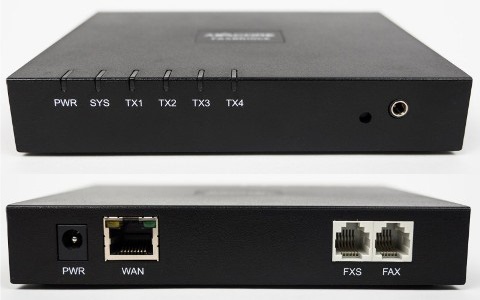
On the back of the device you will have the following ports; Connect them in this order:
- FAX port connects to the LINE port of your MFP or fax machine (use RJ11 cord provided)
- WAN port connects to the internet (use ethernet cord provided to plug directly into a wall port, switch or router)
- PWR port plug into standard 110v power outlet (only use the power supply that came with the device)
- Note: “FXS” port not used.
Once plugged in, the bridge will come on within a few minutes (depending on your network). The power light should be lit upon plugging the device in and once your FaxBridge is assigned an IP address the SYS light should light up. You are now ready to send and receive faxes through the device.
Note: Your FaxBridge must be able to get out of your network on port 443 to talk to our servers. You can always check the current status of your FaxBridge in the web portal to see if the device is online (green dot) or offline (red dot)
Download the PDF
How to setup a Kinect2Fax Bridge